 Powder coating is often discussed as a finishing choice, but for fabricated metal parts, the more important question is usually how that finish gets specified. A drawing that simply says “powder coat black” might be enough for a very simple part, but it leaves too much open when coating thickness, masking, color, gloss, texture, grounding, hardware, or mating surfaces affect how the finished part needs to fit and function.
That’s where powder coating can surprise people. A part can be cut, formed, welded, and inspected correctly, then stop fitting the way it should after coating because nobody accounted for film build, masked the wrong area, coated a threaded feature, or left a critical contact surface covered. Those aren’t usually coating failures. They’re specification problems — and for OEMs, engineers, and purchasing teams, the goal isn’t to turn every drawing into a finishing manual. It’s to give the fabricator enough information to quote accurately, plan the work correctly, and deliver a finished part that looks right, assembles cleanly, and performs the way it was designed to perform.
Why Vague Powder Coating Notes Cause Problems
Powder coating adds a durable, protective, and visually consistent finish to fabricated metal parts — enclosures, panels, cabinets, brackets, housings, frames, kiosks, and other components that need corrosion resistance, color consistency, or a finished appearance. But powder coating isn’t dimensionless. It adds material to the surface of the part, and that added film can change how parts behave. A coated tab may no longer slide into a slot. A threaded hole may become unusable if it isn’t masked. A grounding location may fail if coating covers the conductive surface. A cosmetic face may not meet expectations if gloss level, texture, or color tolerance was never defined.
These problems happen because the coating requirements were left too open, and the more the finished part needs to do, the more important it is to define those requirements before fabrication begins.
Start With What the Coating Needs to Do
Before getting into color numbers or thickness ranges, start with the job the coating has to perform. A part installed inside controlled equipment doesn’t have the same finishing requirements as a part exposed to moisture, sunlight, chemicals, cleaning agents, abrasion, or frequent handling. An electrical enclosure may need coating for protection and appearance but also need bare grounding points; a kiosk enclosure may need a specific color and texture, while a frame or bracket may only need functional coverage.
When the exact powder is already known, include the manufacturer, product code, color, texture, and any applicable standard. When the fabricator is expected to recommend the coating, the drawing or RFQ should still explain the environment and performance expectations clearly enough for the right powder chemistry to be selected — epoxy, polyester, and hybrid formulations behave very differently outdoors, and the fabricator can only match the chemistry to the environment they know about.
Define Color, Gloss, and Texture
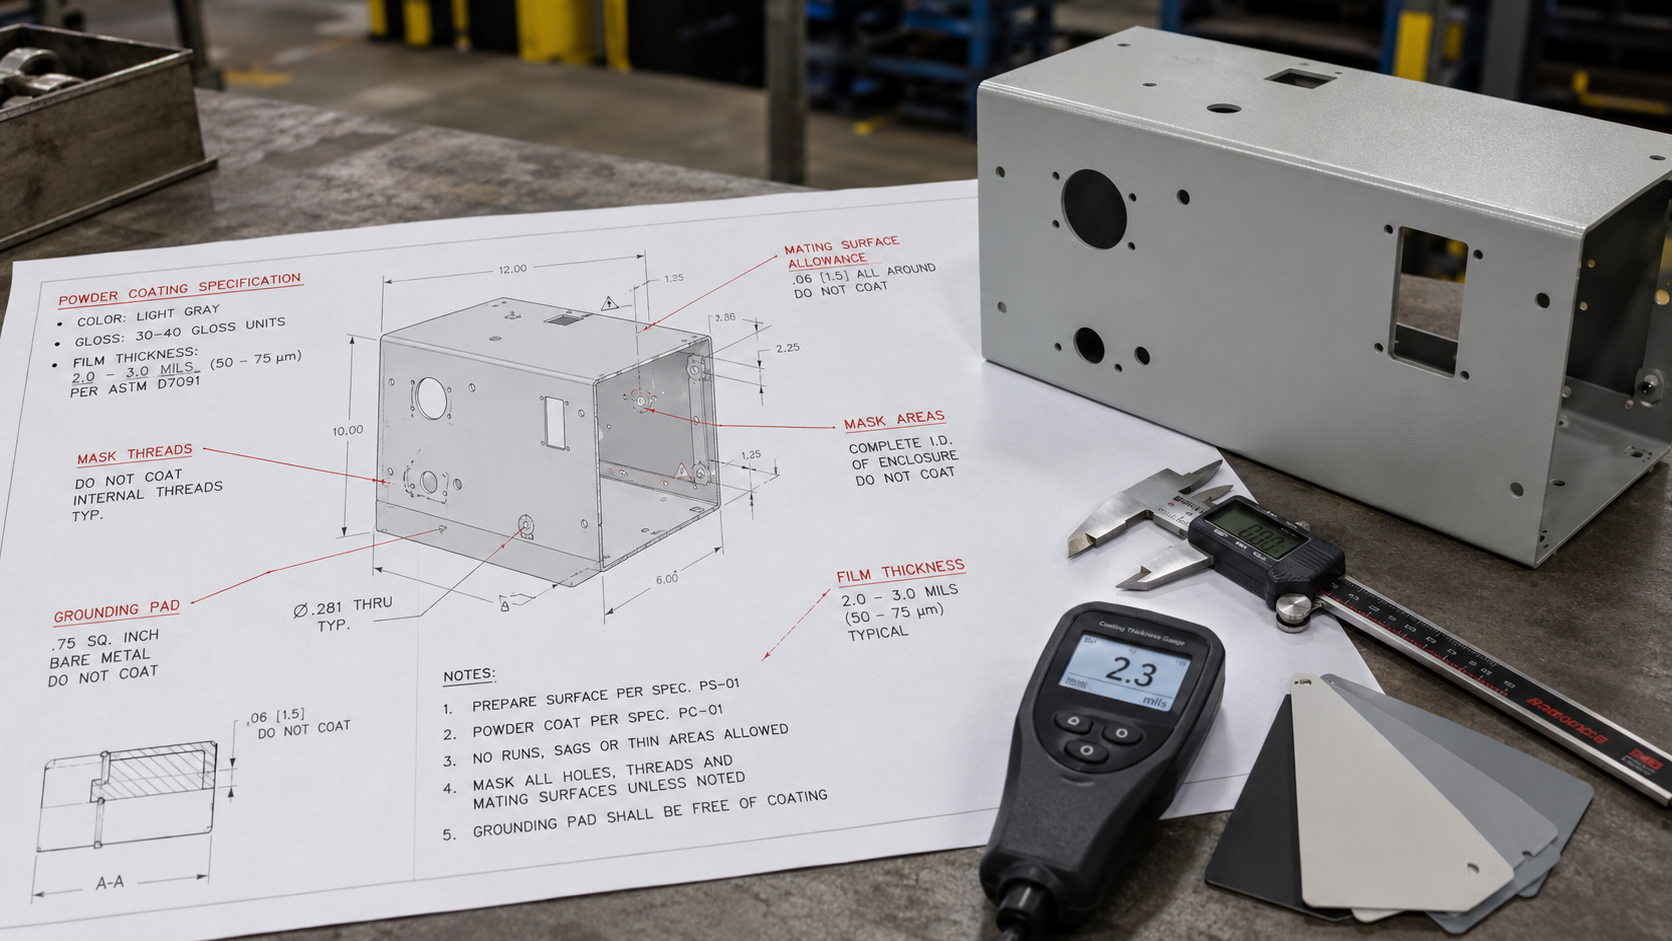
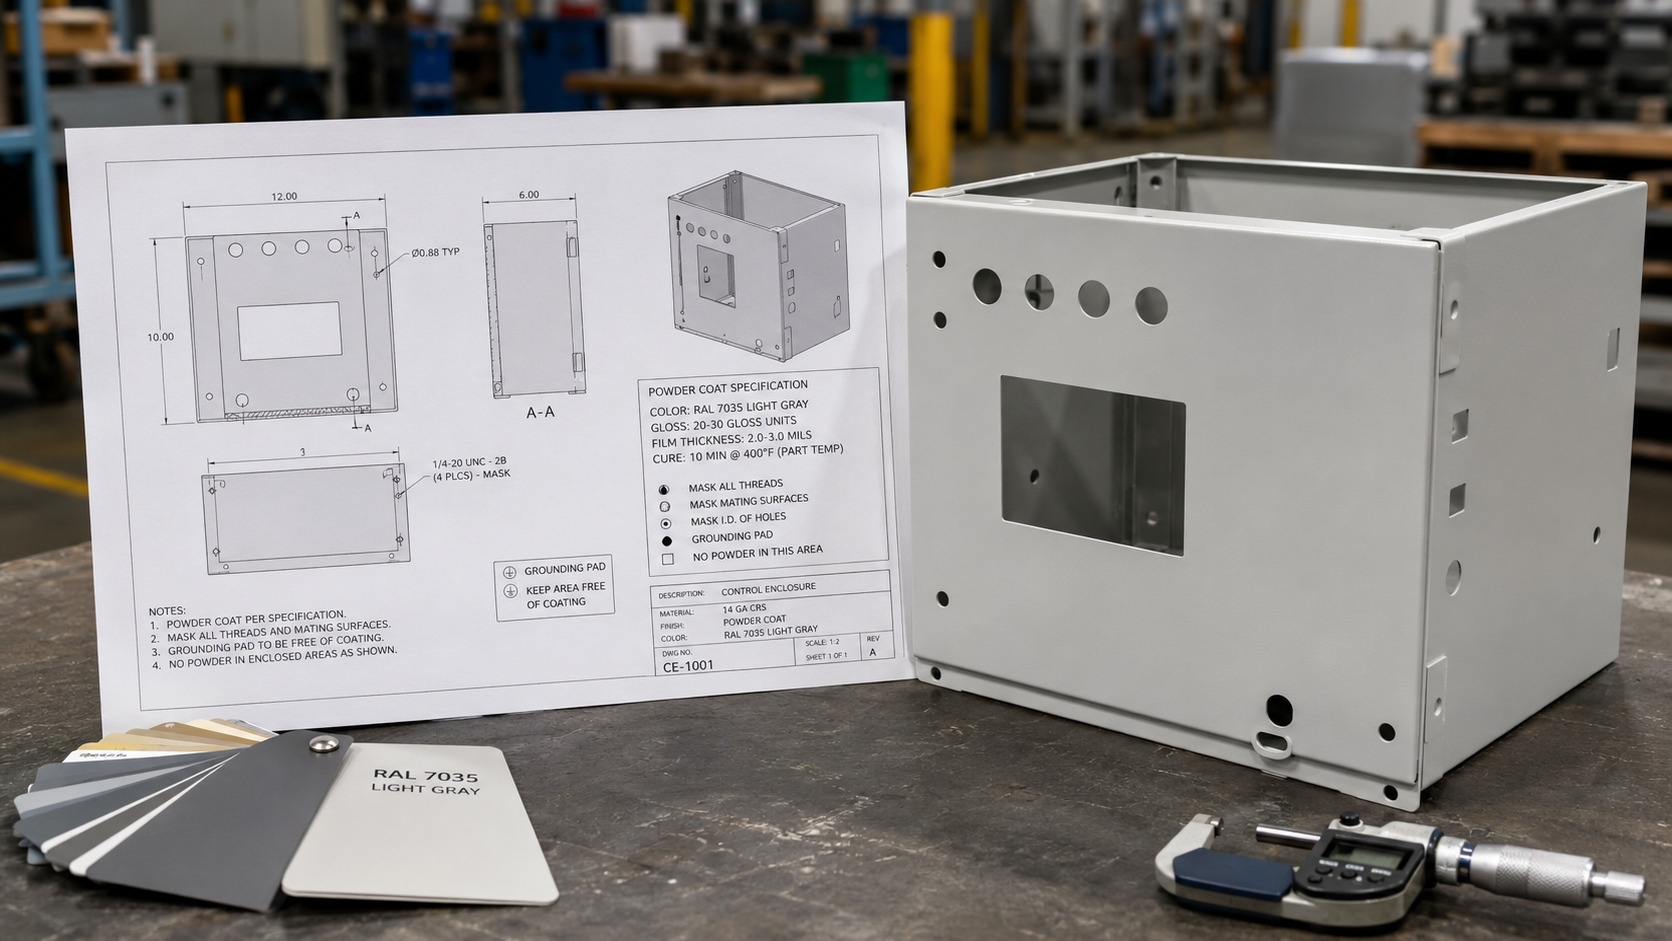
Color is one of the most visible powder coating requirements, but it’s often underspecified. A note like “black powder coat” can mean a lot of different things once gloss, texture, powder chemistry, and supplier color standards come into play. Where color consistency matters — matching an existing product, a brand standard, a previous production run, or other coated components in the same assembly — documentation should include a recognized reference: a powder manufacturer color code, RAL number, federal standard, or approved sample. If the approved sample is the true standard, say that.
Gloss and texture need the same treatment when appearance matters. Matte, satin, semi-gloss, and high-gloss finishes can look very different on the same part, and the choice has practical consequences: gloss finishes make scratches, weld marks, and handling defects more visible, while textured finishes hide minor surface variation more effectively. If a surface is cosmetic, identify it — and if some surfaces are hidden or non-cosmetic, identify that too, because it gives the fabricator a practical way to align surface preparation, handling, inspection, and packaging with the surfaces that actually matter.
Film Thickness, Clearances, and Fit
Powder coating creates a measurable film on the part surface, and that film starts to matter fast wherever the part has tight clearances, tabs, slots, hinges, hardware, threaded features, or mating surfaces. Too thin, and durability or coverage may suffer; too thick, and the part may not assemble after finishing. A part can fit perfectly before coating and still fail after it — this is the single most common way powder coating creates surprises on enclosures, doors, panels, and multi-part assemblies where coated surfaces contact one another. If two coated surfaces are designed with little clearance, film build creates interference. If a tab-and-slot design doesn’t account for it, the tab no longer seats. If hinge areas, door gaps, or enclosure seams are too tight, the finished assembly binds or scrapes.
A good drawing calls out the required coating thickness range when it affects performance, fit, or appearance — in mils or microns, per the customer’s standard — and identifies which surfaces the requirement applies to. If buildup in corners, holes, inside bends, or recessed areas is a concern, that belongs on the drawing too. Most importantly, the drawing should state whether critical dimensions apply before or after coating, because a feature inspected on the raw part and a feature that must measure correctly on the finished one are two different requirements that look identical when nobody writes it down.
Engineers can usually design these problems away by accounting for coating buildup in critical areas: increasing clearances, masking certain surfaces, adjusting hole sizes, or changing tolerance expectations. This is where a design-for-manufacturability review earns its time — a fabricator that understands both fabrication and finishing can identify coating-related fit risks before parts are cut, formed, welded, and sent to the coating line, when the fix is a drawing revision instead of a rework order.
Be Specific About Masking
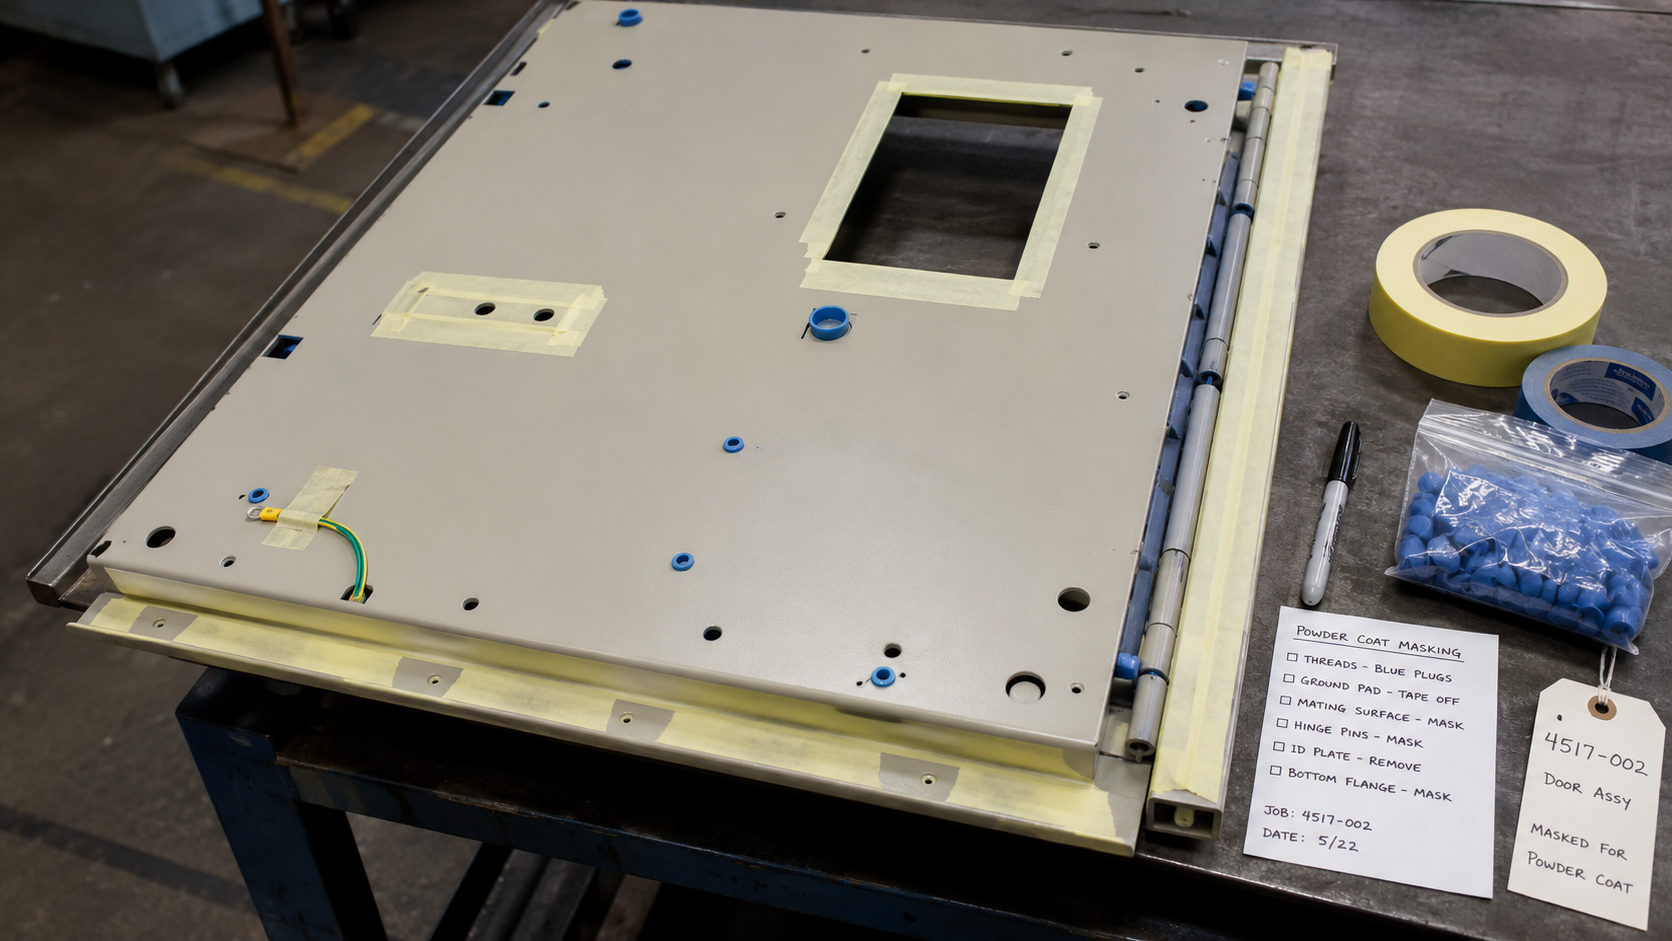 Masking is one of the most important powder coating details to define on a fabricated part drawing. Any surface that must remain uncoated should be identified before production begins: threaded holes, grounding points, electrical contact areas, bearing surfaces, press-fit locations, tight-tolerance features, hardware interfaces, and mating surfaces.
This is not a great place for vague notes. “Mask as required” sounds efficient, but it leaves the interpretation to the shop, and the shop doesn’t know which threaded insert matters to your assembly sequence or where the grounding pad needs bare metal. Identify the specific holes, faces, edges, or areas that need to stay uncoated, show locations and sizes where they matter, and explain the reason when it isn’t obvious. Masking adds handling, labor, and process control, which means it affects cost and lead time — that’s not an argument for avoiding it, it’s an argument for making it deliberate, because clear masking instructions let the fabricator quote the real work instead of pricing in assumptions.
Threads, Inserts, and Hardware: Get the Sequence Right
Hardware adds a question masking alone doesn’t answer: not just what to protect, but when hardware goes on. In some cases studs, inserts, standoffs, or PEM hardware should be installed before coating; in others, after coating, to avoid coverage problems or fit issues. The drawing should make that sequence clear when it matters — if hardware is installed after coating, note it in the assembly process; if coating must cover certain hardware for appearance or corrosion protection, define that expectation too.
These read like small details, but they cause large assembly problems. A part that is dimensionally perfect with unusable threaded holes still isn’t production-ready, and the conversation about whose job it was to plug them happens at the worst possible time.
Identify Cosmetic Surfaces and Inspection Expectations
Not every surface on a fabricated metal part needs the same visual standard. A customer-facing front panel may need a high cosmetic finish while an internal bracket only needs functional coverage — and if the drawing doesn’t distinguish between them, the fabricator has to guess where appearance is critical. Identifying cosmetic surfaces guides surface preparation, handling, inspection, packaging, and final quality review, and it prevents disputes over minor imperfections on surfaces that are hidden, internal, or non-critical.
Inspection expectations should be practical and measurable wherever possible. If color, gloss, coating thickness, adhesion, or visual quality must meet a specific standard, include the requirement; if an approved sample defines acceptance, reference it. The clearer the standard, the easier the finished part is to verify — and the harder it is for two reasonable people to disagree about it later.
Plan for Labels, Graphics, and Secondary Printing
Many powder-coated parts need markings after coating: screen printing or direct-to-substrate printing, labels, logos, icons, warnings, control markings, or operating instructions. The coating provides the base surface; the marking process adds the functional or branded information on top — and the coating’s texture, gloss, cleanliness, and cure quality all affect how those secondary graphics adhere and appear. If markings need to align with cutouts, switches, doors, or hardware, they belong in the coating and fabrication plan, not in a decision made after the parts are finished. For parts that require both, documentation should include print files, artwork placement, color requirements, orientation, and revision control.
Include Packaging and Handling Requirements
Powder-coated parts can be durable in service and still arrive damaged — metal-to-metal contact, abrasion in transit, and improper stacking all defeat a finish that would have survived years of normal use. If a part has cosmetic surfaces, printed graphics, or customer-facing finish requirements, packaging is part of the specification: protective wrapping, separators, orientation, nesting restrictions, or shipment conditions, especially when parts ship directly to a customer site, installer, or OEM assembly line. A finish isn’t complete until the part arrives in usable condition.
Common Powder Coating Drawing Notes
The exact notes depend on the project, but complete powder coating documentation typically covers: powder manufacturer and product code, color reference or approved sample, gloss level or texture, coating thickness range, surfaces to coat and surfaces to mask, threaded holes or hardware to protect, grounding or electrical contact areas, and cosmetic surface requirements. It also addresses whether dimensions apply before or after coating, inspection or testing requirements, packaging and handling requirements, and any secondary printing or labeling.
The point isn’t to overload every drawing with notes. The point is to define the requirements that affect function, appearance, assembly, cost, or lead time — if a requirement can change how the part is fabricated, coated, inspected, assembled, packed, or used, it belongs in the documentation.
Work Through Powder Coating Requirements Before Production
 The best time to discuss powder coating is before the part is released for production, because once parts are fabricated, welded, and staged for finishing, changes get expensive. A fabricator with in-house finishing can review coating requirements alongside cutting, forming, welding, machining, hardware insertion, assembly, and packaging — and that integrated review catches the risks this article has been describing: tight coated clearances, missing masking notes, coating over threaded features, gloss levels that expose cosmetic imperfections, print graphics that don’t align with final hardware. It also makes the quote more accurate, because coating complexity is tied directly to labor, masking, handling, inspection, and packaging.
For production parts and repeat programs, complete specifications pay a second time: the more thoroughly the coating is documented, the easier it is to hold the same finish across multiple builds, facilities, and production runs.
Powder Coating Support at EVS Metal
EVS Metal provides precision sheet metal fabrication, engineering support, welding, assembly, logistics, and in-house powder coating for fabricated metal parts and assemblies, with coating lines at its facilities in New Jersey, Pennsylvania, Texas, and New Hampshire. That structure lets coating requirements be coordinated as part of the full manufacturing process rather than treated as a disconnected final step. For parts such as electrical enclosures, control panels, kiosks, cabinets, housings, brackets, frames, and OEM assemblies, EVS works with customers to define coating, masking, color, gloss, texture, film thickness, and packaging requirements before production begins — which reduces rework, protects critical surfaces, and keeps finished parts aligned with both cosmetic and functional expectations.
To discuss powder coating requirements for an upcoming fabricated metal project, request a quote or contact the EVS facility best suited to support your program.
Frequently Asked Questions
What powder coating information should be included on a fabricated part drawing? A powder coating drawing note should include the coating color or product code, gloss or texture, film thickness range if required, surfaces to coat, surfaces to mask, threaded features to protect, cosmetic surface requirements, and any packaging or inspection requirements that affect the finished part.
Why does powder coating thickness matter? Powder coating adds measurable thickness to the surface of a part. That thickness can affect clearances, threaded holes, mating surfaces, hinges, inserts, slots, tabs, and assembly fit. If coating thickness matters to the part’s function, it should be specified clearly.
Should dimensions apply before or after powder coating? That depends on the part. Many fabricated parts are dimensioned before coating, but critical features may need to meet requirements after coating. If a dimension is important after finishing, the drawing should state that clearly.
What surfaces should be masked before powder coating? Common masking areas include threaded holes, grounding points, electrical contact surfaces, bearing surfaces, press-fit locations, tight-tolerance features, hardware interfaces, and mating surfaces where coating buildup could interfere with assembly or performance.
Can powder-coated parts be screen printed or labeled after coating? Yes. Powder-coated parts can often receive screen printing, direct-to-substrate printing, labels, or other markings after coating. The coating surface, texture, gloss, and cure quality should be compatible with the secondary marking process.
Why should powder coating be discussed before fabrication begins? Powder coating can affect part fit, hardware, masking, assembly sequence, cosmetic surfaces, and packaging. Discussing coating requirements before fabrication helps prevent late-stage rework and makes it easier to quote, manufacture, inspect, and deliver the finished part correctly.